How to Bleed Brakes By Yourself
How to Bleed Brakes By Yourself
Bleeding brakes yourself is a fairly simple task that your average DIYer can complete in a short amount of time. Not only will this check off some routine maintenance but it can also achieve a sense of accomplishment and save you a few bucks. When bleeding brakes by yourself, it should especially be done if you have completed another task that has required opening the braking system like changing calipers or brake lines. Rotor and pad changes can be done without bleeding brakes (see cross drilled vs slotted rotors). By the end of this short blog post, you’ll know exactly how to bleed brakes yourself.
Brake Basics: How it Works
Before we get into the how-to of bleeding your brakes, let’s first get an understanding of how the braking system works. Brake bleeding is the method where the brake line is purged of the air bubbles that affect the brake system. Since most of us have ridden a bicycle, let’s start with that analogy.
A bicycle’s braking system works in a similar way as your vehicle’s. You squeeze a lever connected to a brake line. That line contracts squeezing together a caliper. That caliper has pads on each side that pinch your rim. The friction caused by those pads pinching your rim are what slows your bicycle to a stop. Let’s compare that to your vehicle’s braking system.
In order to stop your vehicle, you start by pressing the brake pedal. That pedal is connected to a plunger that presses inside a cylinder filled with brake fluid. This fluid compresses inside the cylinder and forces it through the brake lines. At the end of these lines are calipers. Just like your bicycle, these calipers compress. Instead of against your rim, these calipers compress against the brake rotors which are connected with your wheel. The friction between the rotor and the brake pads brings the rotor, and in turn the wheel and your car, to a stop.
Importance of Bleeding Brakes
If you think about the braking process, the fluid is one of the crucial parts. This fluid directly connects your input on the brake pedal to the compression of the calipers. Without the fluid, there will be no brake caliper movement and no stopping.
Even if there is fluid in the lines, that fluid can sometimes contain pockets of air. These pockets of air will be able to be compressed. This can lead to a spongy brake pedal. If a great amount of air is in the brake lines, it can even prevent you from stopping at all! This is why bleeding the brake system is so important. Replacing the old fluid with fresh fluid is also a necessary maintenance task to ensure that the hydraulic brake continues to function properly.
What to do When Bleeding Brakes by Yourself
Step 1
The first step is to gather the tools we need to complete the job. We’ll need
- A container to capture the air and excess fluid
- A wrench the size of your bleeder screws (commonly 10mm)
- Lines to move the air/excess fluid from the bleeder screws to your container (usually 3/16″)
- Brake fluid
- Identify order of brakes (start with the one farthest from the master cylinder and work your way closer). This will typically be ordered passenger rear, driver rear, passenger front, driver front.
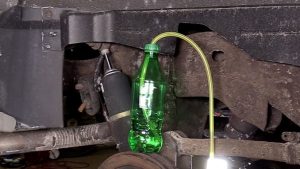
The container is easy enough to make on your own. This can be done with something as simple as a 20oz soda bottle (shown below). To make it air tight, and prevent an air bubble from coming back into the system, drill a 3/16″ hole (or whatever size your bleeder screws and line is) in the cap. You’ll also want a tiny vent hole in the cap too.

Now that you’ve got everything necessary to complete the job gathered, let’s move to step two.
Step 2
Step two starts with filling your brake fluid reservoir completely with fresh brake fluid. Make sure no debris gets into the system when taking the cap off. Once it is full of fluid, tightly return the cap.
Step 3

Then, take your bottle/container and fill it up about a third of the way with fresh brake fluid. You’ll then stick your 3/16″ line through the cap (with the cap screwed on tightly) and submerge it completely into the fluid.
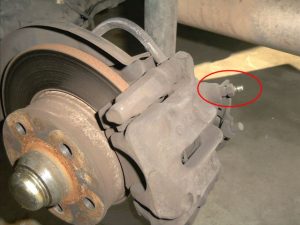
Affix the other end of the 3/16″ line to the end of your bleeder screw (shown above). Crack the bleeder screw about 1/4 of a turn. Any more can cause air to seep passed the threads and not the bleeder hole which will defeat the purpose.
Step 4
You can then enter your vehicle and press the brake pedal several times. You’re fine to get out and look at your line between the bleeder and the soda bottle. Once this line has no bubbles and is solid fluid, you can close the bleeder screw. That corner is all finished!
Before moving on to the next corner, you’ll want to open and top off the brake fluid reservoir and check on the fluid level to prevent it from getting low enough from pulling air through. Repeat steps two through 4 for each of the remaining corners and you’ll be finished!
Keep in mind that each corner you start with, you’ll want to make sure the line is submerged in the brake fluid. This will ensure that vacuum is retained through the entire process and will prevent air from being pulled back into the line.
Once the process is completed you should have a nice firm brake pedal. If the pedal isn’t firm, there is likely air in the system and you should reattempt the brake bleed process. If that does not fix the issue, you may have a problem with the vehicles brake master cylinder.
As always, if you need any help or troubleshooting tips, give us a call at 866-922-3059 or email us at [email protected].
Want more helpful tips? Also see Coilovers, Air Suspension, and Lowering Springs: An Overview and Linear Vs Progressive Springs: Which is Better for Your Car.

Thank you. As bled brakes few times and was not sure if master cyl cap needed to be on light vs loose as have read conflicting views. Anyways your method worked as few bubble erased from back drivers corner after few tries. Pedal seems firmer and will test drives to ensure happy with it and if not will repeat.