Just bought your first “Tuner Car”? This is where you start…

Every car guy is there at some point. You’ve saved up the money and you’re super pumped to go purchase your first “Tuner Car”. For most people, that more accurately equates to a “Used Tuner Car”. No matter how many vehicles I purchase, I still have to battle the desire to overlook glaring red flags because my mind has already painted a picture of how cool the car is going to be…or how cool it once was. Here at COBB we are often asked about the biggest mistakes beginners make when tuning a car….my answer to that would be that young gearheads really suck at the ability to curb their enthusiasm.
Don’t Let Short-Term Excitement Lead To Long-Term Grief.
There are a lot of people out there that buy a $4000 Subaru with over 100k miles on the engine and immediately start to talk about making 400+ horsepower and driving it to work every day. Can it happen…of course, but there are a lot of things that have to go right in order to get there, and more often than not. The natural excitement of a new project and shiny turbo dreams get in the way of the correct process. But this doesn’t only apply to old worn out budget builds. Any car that you plan to heavily modify needs to be approached from the same perspective.
But do not fret…the purpose of this article is not to crush your dreams. It is to set realistic expectations and more importantly….give you a simple but valuable series of steps to go through BEFORE you start spending money on parts and a tune. It applies to any car in any situation, but the older the car and the more you intend to modify, the more important this becomes. In fact, most of this should be performed before you even purchase the vehicle. It may feel like a burden or hassle, but I promise, following these steps from the beginning will not get in the way of building your dream car, it will make sure you get there as soon as possible with the fewest headaches and regrets along the way.
VEHICLE INSPECTION GUIDE FOR ALL NEW TUNERS!
Vehicle History
Previous Modifications – The very first thing you need to do is thoroughly investigate the car for any signs of previous modifications. We receive phone calls and emails on a weekly basis from customers that are confused because their “new” car acts strange when they try to use an Accessport with it. Usually, it turns out that they bought the car used with bigger aftermarket injectors or it was converted to speed density etc etc but the buyer had no idea or never bothered to check. Then attempted to run an OTS map or different custom tune intended for a completely different set of parts.
- Make sure the previous owner hasn’t done anything incorrectly that needs to be fixed before you begin making your own changes.
- Also, if the car is not completely stock. You need to know exactly what parts are on the car and the details about them. Some may be fine to leave on the car but you will need to have a solid understanding of how they will impact other modifications you might make.
Previous Tuning/ECU manipulation – Just like the bolt on mods, never just assume that the ECU of a used car has never been tuned. This one is a little more tricky to diagnose if the previous owner does not provide the information willingly, but here are a few things to look for:
- Does the car have any modifications that would require tuning in order to work properly or function without CEL’s?
- If you attempt to apply your own tune to the car. Does it have trouble establishing communication with the ECU? Does the car run poorly after applying your own tune even if you feel as though the tune is accurate? Do you have CEL’s appear after applying a new tune that was not present before?
As you can tell, investigating the existence of a previous tune is basically just trial and error in most cases. Which is why it’s extra important to make sure you get as much information about the car from the previous owner as possible and do your best to determine exactly what parts may or may not exist on the car in its current form. In many situations, if you attempt to use an Accessport or other 3rd party tuning software on a car that already has a tune. That tune will be overwritten and removed forever. So if you accidentally erase a tune for a car on large injectors and don’t have a map ready to go for the same fuel setup, then you just turned your car into a giant paperweight, so don’t gamble with this. Sometimes you are better off just taking the car to an experienced performance shop to let them do the investigation for you.
Mechanical Inspection
The following is a list of areas and parts to investigate as soon as possible. I’ll include some helpful tips, but most of these are simple and easy, so check all of them before you begin tuning.
Pop the cap – I’ve purchased and sold several cars over the last few years and it amazes me how often someone will purchase a car without ever even checking the dipstick or peaking under the oil cap. I’m going to assume that if you are interested in tuning, you know how to check a dipstick and wouldn’t skip that step, but that is not the only thing you should do when prepping to buy or modify a car that is new to you.
- Use your nose – When checking out a car is to simply pop the oil fill cap and take a whiff. It won’t smell yummy but it there are certain things to pay attention to. Do you smell fuel or coolant, is there a stronger than normal smell of burnt oil? If so, this can be one of the first signs of problems with the fuel system, various gaskets, or other sealing components in the engine.
- Shed some light – Make sure you have a flashlight to peek inside while you sniff around. Infrequent oil changes, overheating, or head gasket leaks will usually produce some obvious visual cues.
Fluids – Checking the car’s oil is a no-brainer, but if you really want to go that extra step. You can even have a sample of the car’s oil professionally inspected to provide a lot of feedback about the past and present health of the engine. Companies like Blackstone Labs offer detailed oil analysis services for a fair price.
Engine oil isn’t all that matters. If you plan to tune a car, that means you plan to drive it hard as well. Unless you know for sure that certain fluid changes have been done recently. Checking and changing fluids for the cars coolant, brakes, transmission, steering, and differential(s) should be considered mandatory, not optional.
Pressurized Smoke Test – One of the most common and difficult to diagnose problems that exist on pretty much any used turbo car are vacuum/boost leaks. There is a long list of problems that occur when trying to tune a car that can be traced back to some small air leak tucked away in the dark corners of the engine bay. Luckily, there is a super easy and effective way to track them down….a Pressurized Smoke Machine. There are a lot of DIY at home garage tricks people try, like using soapy water or literally blowing smoke into your intake etc…..I won’t say those techniques are a total waste, but they will never provide the results of a proper pressurized smoke test. Check out the video below to see how it works and why it’s so important. Most people won’t go out and buy their own machine, but any decent local performance shop should have one and the small service charge to have a test done on your car will be worth it every time.
Compression/Leak Down – Just like the smoke test, a compression and leak down test is an absolute must before you even consider spending a single penny on aftermarket performance modifications. Don’t try to build a house until you know you have a good foundation. Buying or renting a compression and leak down test kit is not too difficult if you want to do this at home. But paying a professional is still always a good choice if you are not confident in your own ability.
Some people will claim that you don’t need to do both because they are basically the same thing….that is fake news. A proper test should begin with a dry compression test, followed by a wet compression test, then a leak down test. Each test can provide you different information to give you a more broad understanding of the engines ability to not only create compression but also maintain compression while providing hints regarding what specific components may be the weak link if the results are not ideal. For example, damaged valves will produce different results compared to worn piston rings and so on, but those results may not be as clear or even noticeable with only a compression test.
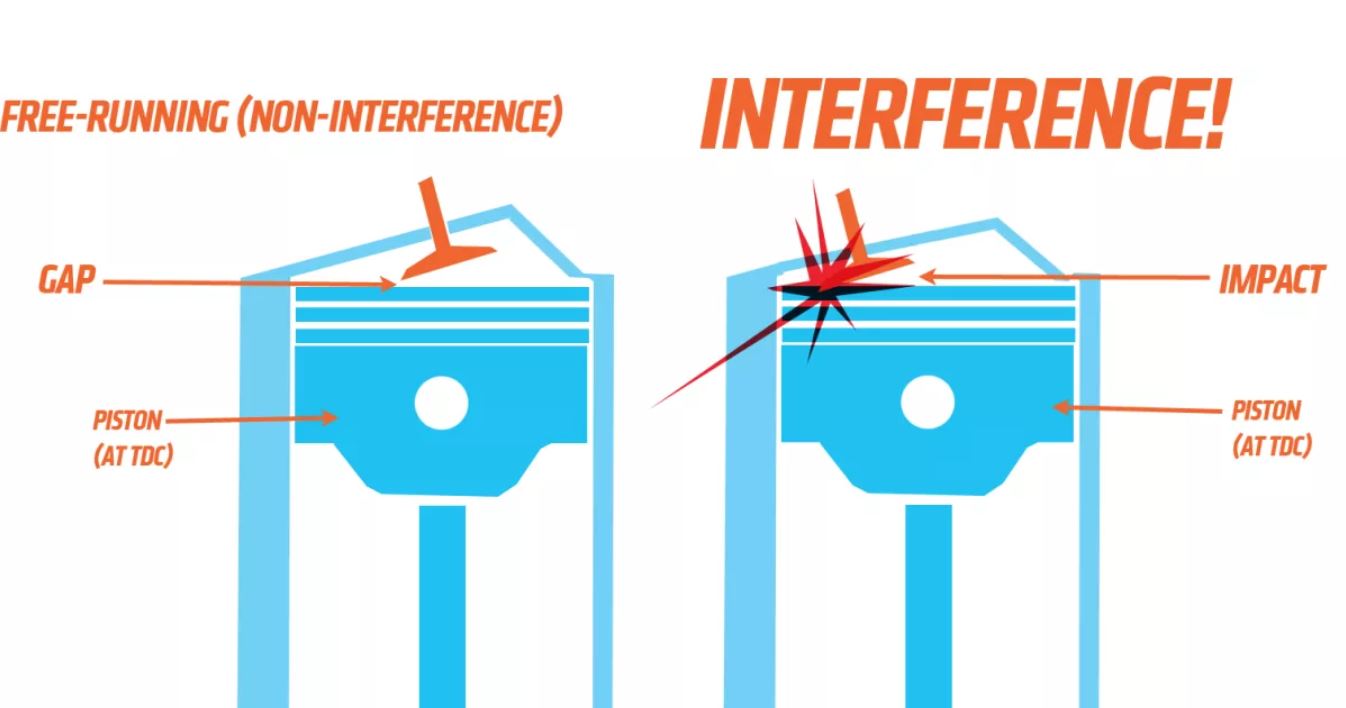
Timing Belt – Many engines are known as “Interference Engines”. In short, what that means is that the if the valves in a particular cylinder are open and the piston moves to Top Dead Center (TDC) aka the highest point of travel…it will make contact with the valves. Naturally, if that happens it will cause major damage. The Timing Belt/Chain is what keeps your Camshafts (which control valve position) in time so that your valves are not open when the piston moves into TDC. Also, even an engine that is Non-Interference (i.e. “Free-Running” – the piston can’t reach the valves regardless of position) it is sometimes still possible for opposite valves to hit each other if they opened simultaneously. So if you do not know for sure that the timing belt/chain has been replaced recently and the car you want to tune is anywhere near the recommended service range, do not gamble….you do not want a timing belt to fail and send valves and pistons smashing into each other when the engine is spinning at a few thousand rpms.
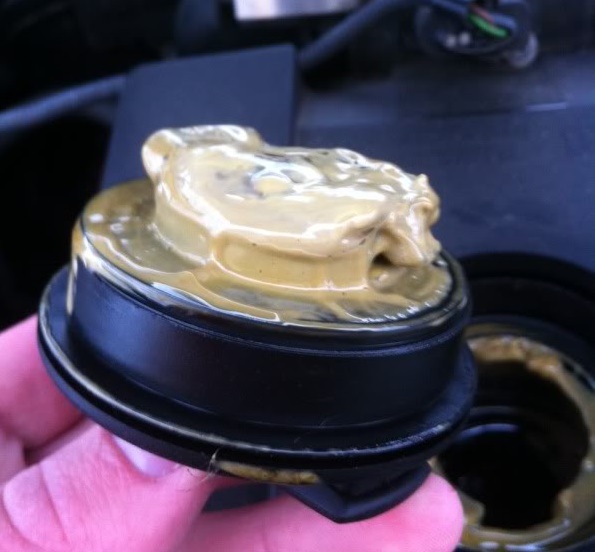
Check for Gasket Leaks – We partially covered this above when looking under the oil cap, but even if everything looks fine from there, that only ensures that fluids aren’t getting in places they don’t belong inside the engine. You still might have fluids trying to escape. Look for signs of fluid/oil seeping between the valve cover(s) and head or between the head and block. Also look underneath the car to see if oil residue has built up on steering or suspension parts below the engine as a sign of previous leaks. Plus, if you smell burning oil that doesn’t seem to come out of the exhaust, then that may be a sign that oil is dripping on hot components under the hood like the exhaust manifold or turbo.
Don’t forget to also look for exhaust leaks.
- Inspect the entire exhaust system, from the manifold all the way to the exhaust tip.
- Pay extra attention to areas near flex joints, flanges, welds, or gaskets as these are where leaks are most likely to occur.
- A common sign of a leak is black soot around the leak (see picture below).
- Also, if you think you hear a leak or see something suspicious. Try starting the engine and holding your hands or a paper towel near the potential leak. You might be able to feel or see the exhaust escaping.

Spark Plugs – signs of knock – The spark plugs in your car’s engine are like your palms….you can read em…except it’s not a bull crap scam. Even if it’s not time to change them yet, it’s a good idea to pull the spark plugs out to see what you can learn about the engine’s running condition based on how the plugs look. NGK Guide – How to read a spark plug
Battery Power and Wiring – Problems related to battery power and wiring can be intimidating for beginners, but there are a few basics that anyone can quickly understand to make sure the electrical system in your car seems happy. A lot of people don’t realize that an unhealthy electrical system doesn’t only affect the cars accessories or starter, it will also prevent the engine from running at its full potential.
- Visual Inspection – Start off with the obvious. Take a look at the battery terminals and the power and ground wires. Check for corrosion, loose connections.
- Grounds – There are a few places in the engine bay where the battery and harness has dedicated grounding locations. Inspect those to make sure the ground wire/strap, hardware, and grounding location are in good shape and securely bolted down.
- Aftermarket Electronics – Chances are the previous owner might have installed gauges, an alarm, audio equipment, a turbo timer etc. Not everyone does the best job of wiring in these types of devices. So make sure you are aware of any that might exist and take a close look at the installation for signs or poor work. In many cases, it’s best to just remove them.
Suspension/Axles/Mounts – I won’t go into much detail here, we’d need an entire article dedicated to this topic. The cliff notes version is….don’t forget the impact that increasing engine power has on the entire rest of the car. The more power you make the more stress is applied to the items that keep that power where it belongs. So make sure to inspect various bushings, motor/transmission mounts, axles, control arms, subframes etc. for signs of damage in the form of cracks, leaks, missing hardware, bends, rubbing and so on. It doesn’t matter how much you increase power if the rest of the car can’t handle it.
Check the turbo – If the car makes boost consistently and there are no obvious odd sounds or symptoms of a worn out turbo, then you don’t necessarily need to worry about this on day one. But on most cars it’s not too hard to access the turbo while in the process of working on other parts like the intake/turbo inlet, intercooler, or downpipe. Those are some of the most simple mods that people often perform early in the tuning process. So remember that while you are in there, it’s a good chance to inspect the turbo for signs of wear before things get too bad.
- Look closely at the blades on the compressor and turbine wheels for any chips, scratches, or other imperfections.
- Inspect the housings around the wheels to see if there are witness marks as a result of unwanted contact on the surface
- Look for oil residue or other deposits that clearly don’t belong
- Shaft play – Gently hold the center of the turbine or compressor wheel and lightly push and pull both up, down, side to side, as well as in and out. This will give you an idea of the health of the bearing inside the turbo. Also look to see how close the fins on the wheels come to contacting any surrounding surfaces.
- Note – it is actually okay on many turbos for there to be a very small amount of play in the shaft, so don’t panic if you notice subtle movement. When the engine is running, the shaft “floats” as oil moves through the turbo and fills in that slight gap.
- Also, make sure it spins freely without odd noises or unbalanced behavior.
- Don’t forget to also check out the wastegate. Make sure the actuator moves freely and the flapper door is seated properly and is not damaged. Also, the preload on some wastegate arms can even be adjusted manually. If so, the arm will be partially threaded with a nut. Take a look to see if that may have been tampered with.
Click Here for a helpful turbo troubleshooting guide from Garrett.
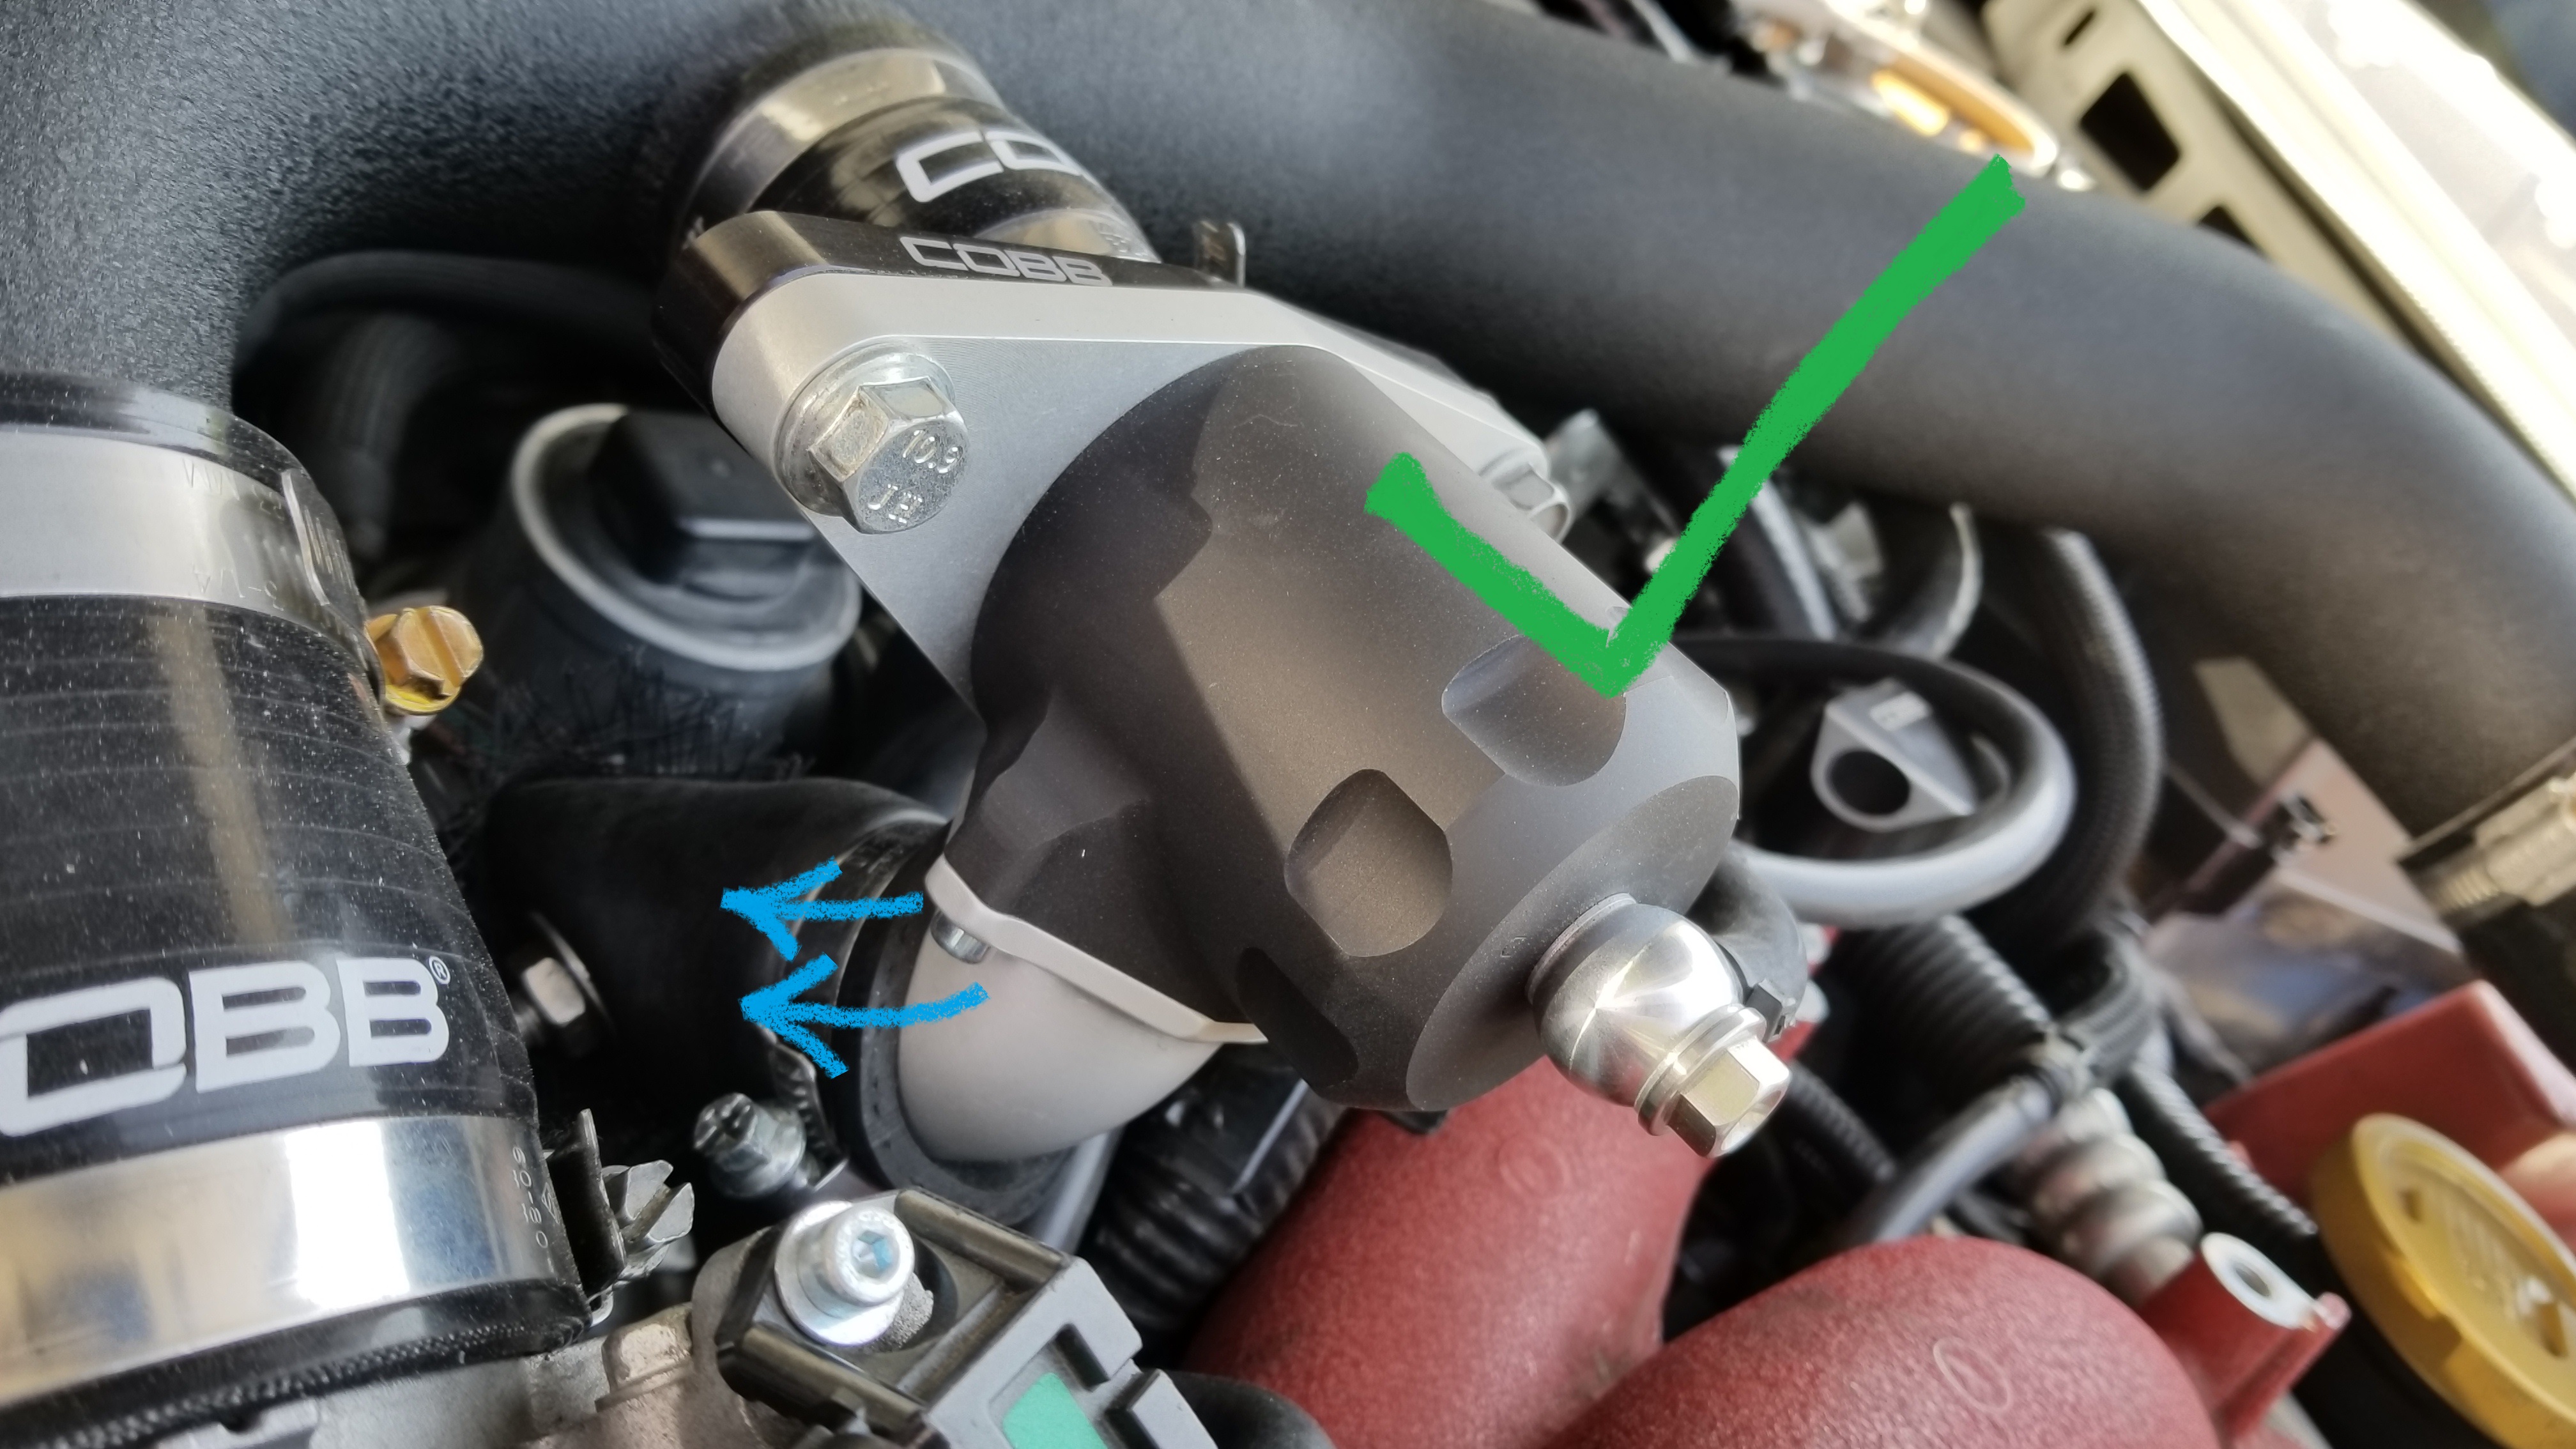
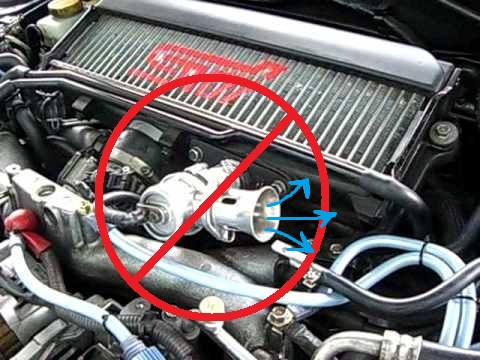
VTA BOV on a MAF car – **IF YOUR CAR USES A MASS AIR-FLOW SENSOR TO METER INCOMING AIR – DO NOT USE A BOV (BLOW-OFF VALVE)** This is very straightforward. Many of the cars we tune use a Mass Air Flow Sensor (MAF) as part of the process for measuring the amount of air entering the engine in order to apply the correct amount of fuel for the ideal air-fuel ratio (AFR). This type of system requires the use of a Bypass/Recirculating Valve. When the throttle closes on your engine, there is air trapped between the intercooler and throttle plate that needs somewhere to go. This valve redirects air back through the turbo inlet but behind the MAF sensor because that air has already been metered when it originally came in through the intake. Many people will replace the factory valve with an aftermarket valve, but they don’t always use one that recirculates because they want that loud “Blow-off” sound. It might sound neat-o, but if your car is not meant to release that excess air to the atmosphere that means the ECU expects that air to find its way back into the engine and is calculating fuel injection to match. So if you buy a car that has one…take it out and throw it on the ground.
Some aftermarket valves only work one way and others are adjustable for either recirculation or atmospheric ventilation, but the easiest way to tell is to just look at it. If it connects to a hose that returns so some point before the turbo and after the MAF in the intake system, you are good to go. If it just opens up to the engine bay, that’s a problem.
 |
 |
Sensors – This step is one of the most frequently forgotten. The first thing to do is to find a sensor diagram online and track down all the major sensors that will play an important role when tuning the car, especially MAF, MAP, O2, and Knock sensors. Make sure they are where they should be but also look closely to be sure they are in good shape. Also, if it appears as though one or more of them may have been replaced at some point, double check to be confident the new sensor is appropriate. If it seems to be aftermarket, it may function at a different range than stock which is another sign that a car may already have custom tuning or could be the explanation for why a car seems to run poorly.
- If the car has original sensors with 100k miles or more, it’s a good idea to go ahead and replace some of them, even if they seem to work well. It may feel like a waste at first because they usually aren’t cheap, but with sensors like the MAF or O2, they provide vital feedback to the ECU and you want them to perform as well as possible when you start cranking things up.
- When you do replace sensors or if you notice the previous owner already has. Be 100% sure the car has the exact original OEM part. Do not just grab something from the local parts store or online that happens to fit, and check more than just the brand. Even if it is from the same manufacturer, that doesn’t guarantee it will work properly with your specific car.
Special Tips for Direct Injection Engines
Many engines are using direct injection now and while all of the above still applies, there are a few extra things to keep in mind.
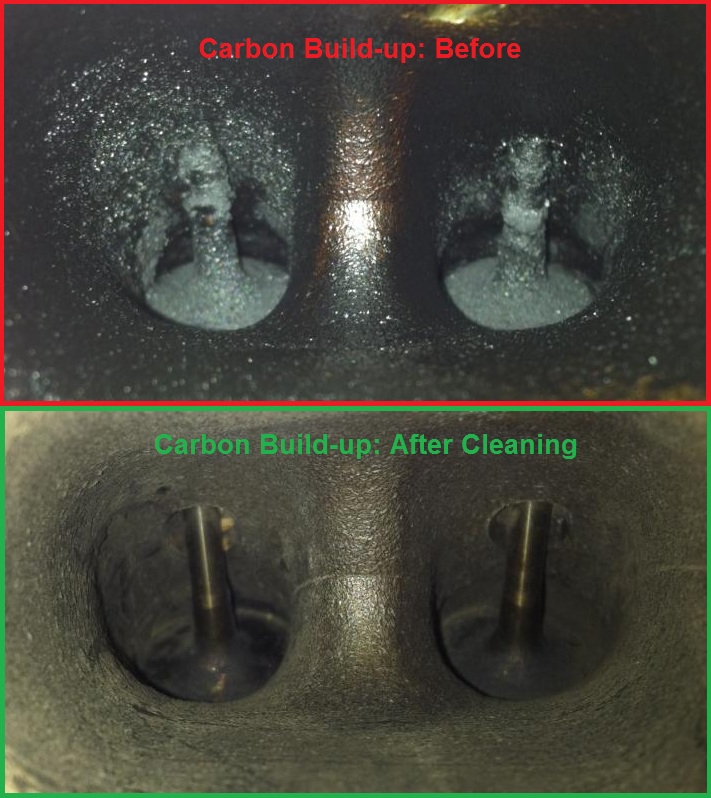
Nasty Valves – Over time as you drive your car, oil vapor and carbon will gradually build up deposits in a few areas. One of the most significant is on the back side of the intake valves. That is naturally a very important area that needs to maintain a solid seal for compression, air needs to flow freely across them when the open, and we don’t want bits of carbon and oil residue dropping into the combustion chamber. Port injected cars mostly solve this problem automatically because fuel acts as a solvent and cleans the valves as it is sprayed behind them. With direct injection, the injectors spray directly into the combustion chamber, so nothing helps to clean the back side of each valve. The build-up becomes a problem at a different rate for each car but it is inevitable on all of them.
Coil Packs – This is a part you should be aware of on all cars that use them, but with DI cars they have a history of failing at a more frequent rate. If a car develops misfires, often you can track it down to a specific cylinder and many times, it’s as simple as replacing the coil pack with a new one. On some cars you can even perform an easy test by scanning the ECU through the OBDII port to see what cylinder is throwing a misfire code. Then try swapping the coil pack from that location with one that isn’t missing and see if the misfire follows the coil pack. If not, then the problem maybe be a spark plug or injector etc.
Spark Plugs – We’ve mentioned spark plugs already but the rules are slightly different for DI cars. Spark Plugs wear out much quicker with this type of engine. If plugs have not been changed within the last 2-3 years or 25k+ miles. I would recommend investing in a new set as soon as you begin tuning the car and you should plan to change them on that same cycle as long as you have the vehicle.
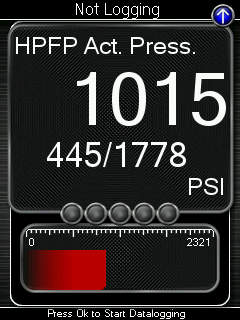
High-Pressure Fuel Pumps – In order for the fuel to properly atomize when injected directly into the cylinder. Direct injection cars use special fuel injectors and also have a secondary high-pressure fuel pump that takes the fuel that has already been pumped up from the gas tank at a typical pressure of 40-50psi and cranks it up many times over, beyond 2000psi in some cases. Most cars have a relatively specific pressure range that the pump should always be able to achieve during specific driving conditions. It varies from car to car, so do a little research to find out what psi your engine needs to maintain. With some cars, you simply need to monitor the pressure to make sure the pump is working well, but in other cases, upgrading the pump is a very important part of the modification process.
Parting Words
The best advice I can give to anyone starting a “Tuner Car” build for the first time is this. Don’t worry about how much power or boost your car makes or how fast it is…at least not at first, it doesn’t matter… and it’s almost always gonna be less than what you convinced yourself it was gonna be. When you are just getting started, chances are the build is not intended for competition, so don’t try to compete with other people. Remember that you are doing it for fun and because you have a passion for the car and community. The majority of self-inflicted problems and failures for beginners are a direct result of people running before they can walk and try to reach some magical end goal of power or some other particular performance measurement that they have arbitrarily set as the required bar for a successful build.
Buy quality parts, learn from truly experienced people, and set realistic goals you can achieve as you go instead of making the end goal the only goal. Take your time and do things the right way and do them patiently. Whatever power the car makes is what it makes. When you start from a solid foundation, you can always go further if you are not satisfied at any point, but you can’t get back money, time, and missed opportunities that result from getting in over your head or taking shortcuts. I can promise that if you approach a build from the right mindset the car will be something you enjoy for the entire process instead of always looking into the future for what you wish the car was.
Leave a Reply