Tuning a BMW

Tuning a BMW
Most owners know by now that BMW tuning is one of the best bang for your buck modifications you can make. But, lesser known is how exactly to tune a BMW. There are many ways accomplish tuning your BMW. These can be incredibly complicated and involve knowing how to tune a car. Whether you’re tuning a Mustang EcoBoost, tuning a Subaru, tuning a Volkswagen, or tuning a BMW, the easiest and best method uses the COBB Accessport. This requires no tuning knowledge whatsoever. The Accessport supports most N54 BMWs (135, 335, 535, x6, z4, x5) and early N55 BMWs (135, 335, x5, x6) covering ~2007 to ~2012 model years.
How easy is it to tune a BMW?
Tuning with the Accessport
Once you’ve received your Accessport, it’s time to use it to tune your BMW! Let’s go through the process step by step to see just how easy tuning can be.
1. You will need the Accessport and OBD-II cable (included with the Accessport) to perform the installation. Make sure the vehicle’s ignition is off and the engine is not running.
2. Locate the BMW’s OBD-II port. Location of the OBD-II port may vary depending on the vehicle model. For most supported BMWs, the location is shown in the picture below
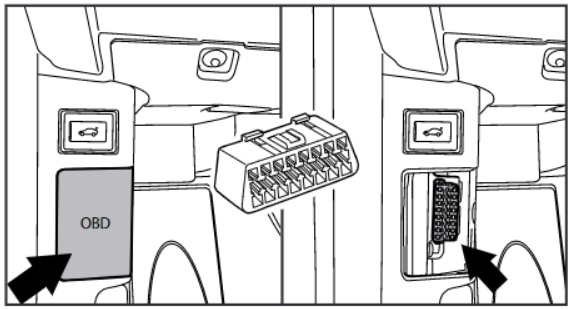
2.1. Plug the OBD-II cable into the OBD-II port under the dash of the vehicle.
3. Connect the small end of the OBD-II cable to the port on the bottom of the Accessport
4. Make sure the clasp on the OBD-II cable firmly engages with the Accessport.
5. We’ll need to get the BMW in the “ON” position. To accomplish this, simply press the Start button without your foot on the brake. Turn off all in-car electronics (AC/heater fans, headlights, stereo, etc.) and make sure all doors are shut.
6. Select Install from the Accessport menu by pressing the OK button to proceed with installation.
The Accessport will attempt to automatically determine the target vehicle for installation. Verify that the identified vehicle is correct and press OK to confirm. You will then proceed to selecting the “map” or tune you wish to install.
What Is A Map?
The Accessport reprograms the factory tuning parameters inside the engine control unit (ECU) using map files, which contain specially written instructions for the Accessport to follow during the reprogramming process. A map file can contain information for any number of different modifications or enhancements to a vehicle, ranging from a race map to an economy map for vehicles in different configurations. Through the use of the Accessport and different map files the ECU can be reprogrammed to accommodate virtually any vehicle configuration.
Map Selection
After the Accessport identifies the vehicle, it will present a list of maps. Maps that are not intended for the identified vehicle are displayed in gray. The Accessport will reprogram the ECU with the calibration data from the map selected for installation. This will become the base data for the ECU. To ensure the best performance, select the map that most closely matches the modification level of the vehicle.
If you are unsure about which map applies to your modification level, please see the BMW Map notes (N54, N55) for the for the modification requirements for each map.
Select a map and press OK to proceed with the installation. If you wish to see a longer description for the highlighted map, press and hold the OK button on the desired map.
The Accessport will automatically proceed with installation to the vehicle. At this point the Accessport reprograms the vehicle’s ECU with new program data and calibration parameters from the installation map file.
Follow all on-screen prompts on the Accessport to complete the installation process. The Accessport is now fully installed and ready for use on your BMW and it is programmed with new calibration data. The Accessport does not need to be plugged into the vehicle for the calibration to be in effect. You can disconnect the Accessport at this time or leave it plugged in to use any of the many features outlined below.
N54 Modification Requirements and Power Gains
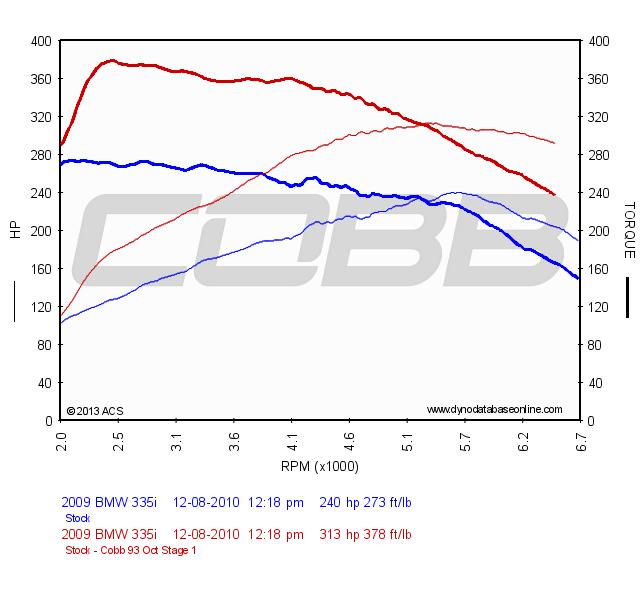 |
STAGE 1
|
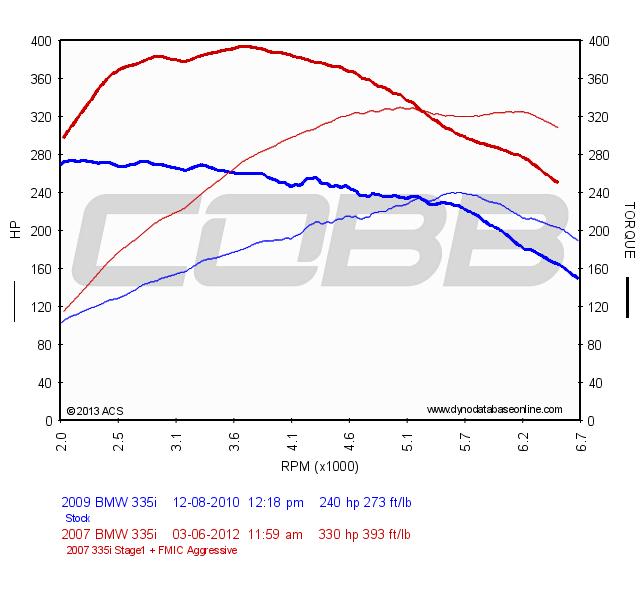 |
STAGE 1+ FMIC
|
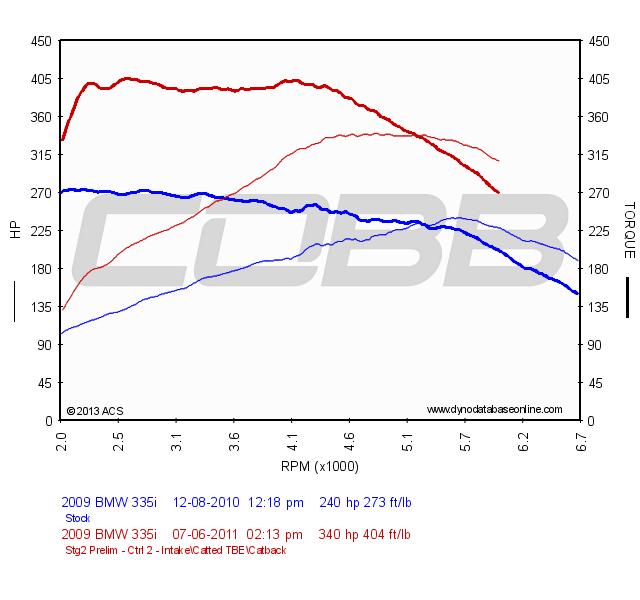 |
STAGE 2
|
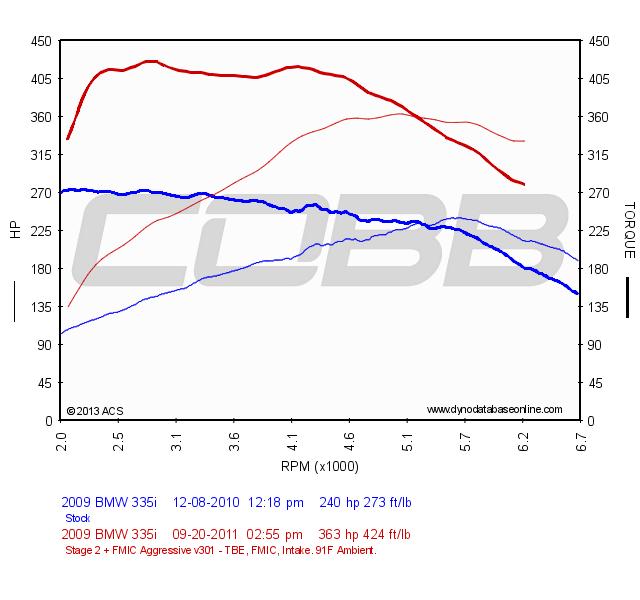 |
STAGE 2 + FMIC
|
N55 Modification Requirements and Power Gains
 |
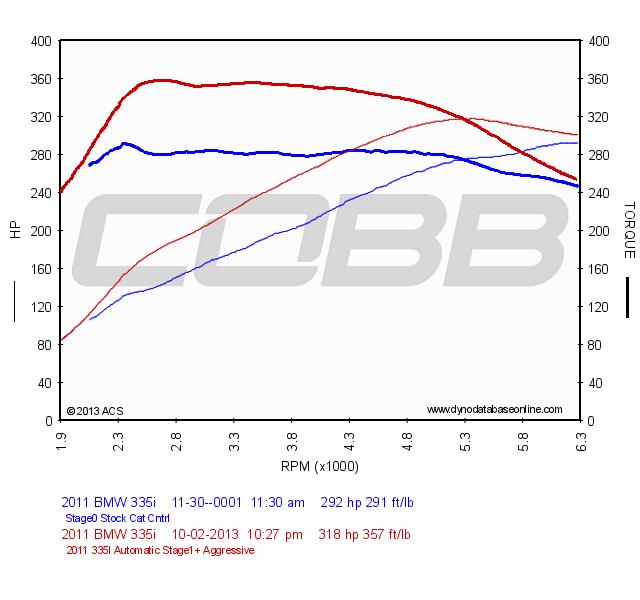
STAGE 1
|
 |
STAGE 1+ FMIC
|
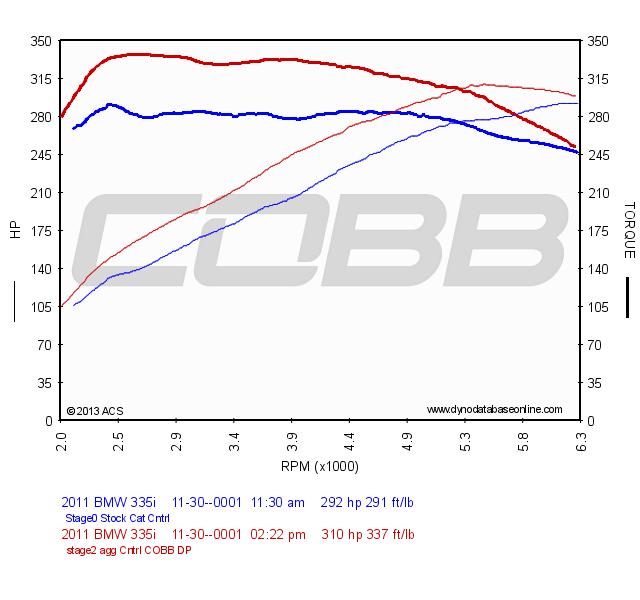 |
STAGE 2
|
 |
STAGE 2 + FMIC
|
I Tuned my BMW, Now What?
The Accessport for the N54 or N55 BMW is a powerful tool. Aside from being able to flash the ECU with different tunes, and a diagnostic tool able to read and clear codes, it can also display and record hundreds of different parameters. From Ambient Air Temperature to Vehicle Speed Sensors and everything in between, the Accessport will be able to provide you with the data you need.
Data Monitoring
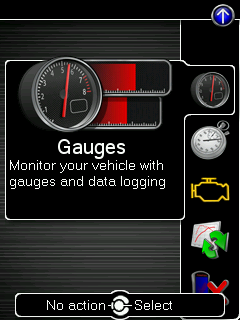
The Gauges menu contains all monitoring and datalogging settings. The first time a V3 Accessport enters the Gauges menu, you’ll be asked how many monitors you would like to display.
Each time you return to the Gauges menu, the selected layout/number of gauges will be used until it is changed in the Gauges Setup menu. This provides the ability to monitor different things in different situations. You can select 1 or 2 gauges to be prominently displayed for the track and have different settings with more gauges for street/economy monitoring.
Every BMW Accessport will come with a default monitor log list. This is a good starting point to get an overview of what the car is doing. If you wanted to determine something more specific, you can change the monitors that are being datalogged. This can be done by
Entering the Gauges menu
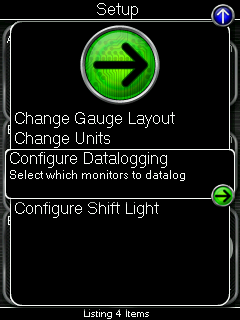
Then, enter the datalogging/gauges setup menu by selecting the arrow at the top of the gauges screen, then enter the Configure Datalogging menu.
Once in the Configure Datalogging menu select the monitors you would like to log.
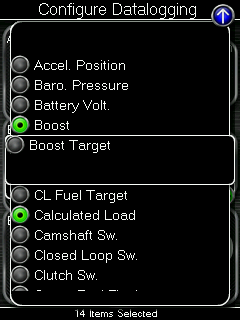
Then, press the Back (left) button to save the changes. You’re ready to take a log!
Datalogging
It’s important that certain conditions are present when trying to determine if the car is healthy and performing as it should. Typically, you won’t get much relevant diagnostic data through idling or light throttle conditions. We recommend a 3rd gear Wide Open Throttle pull from about 2500 RPM to near redline. Any potential issues will usually be evident during this event.
To begin the log enter the Gauges menu
Then, press the OK (center) button to start datalogging. Once started, a scrolling dot will appear on the screen along with the logging rate displayed at the bottom.

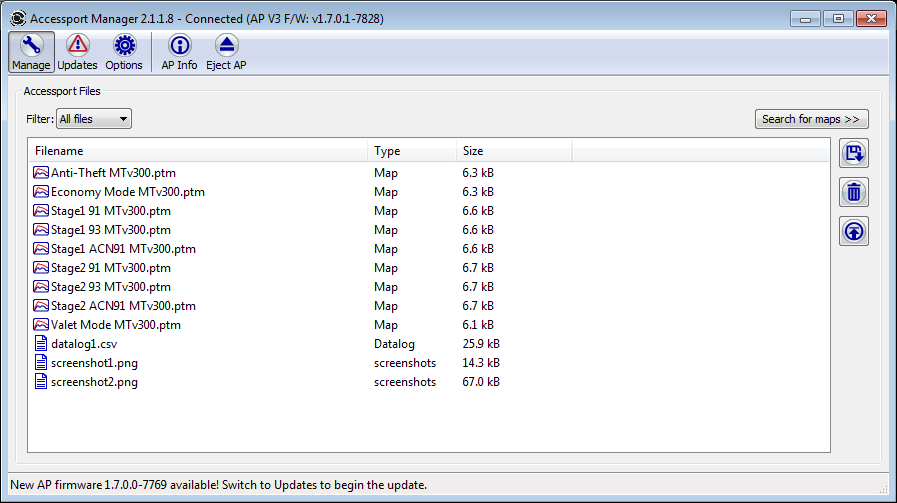
Press the OK button or Cancel button to stop datalogging. You can then connect the Accessport to Accessport Manager on your computer and download the catalog files in the Manage tab. Up to ten (10) datalogs can be stored on the Accessport at any time. The lowest number is the oldest log and the highest number is the newest.
You can then open the datalog in any spreadsheet or log viewer application. For most applications, double-clicking on the datalog will open the file properly.
What do all of these parameters mean? You can find a brief description for each on our BMW Monitor List. The most critical to make sure the car is healthy and performing well are listed below.
Important Monitors
There are a few parameters that do wonders for helping to put other monitors into context, as well as showing your environment and driving style. Ensure your logging the default monitors as that will give you all of the core data needed. To ensure your logging the default monitors please click on Gauges, than Setup, than Configure Datalogging, Setup once more, and finally click on Reset to Defaults. If your protuner asks you for any additional monitors those can also be quickly added under the Configure Datalogging setup menu when needed.
Accelerator Pedal Position
Measures the amount the accelerator pedal is pressed down by the driver. Does not always equate to the same amount of throttle blade position and can give us additional information similar to what throttle position offers.
Actual Load
Engine load after all compensations. The amount of power given based on what the computer sees going on with the engine.
Barometric Pressure
Air pressure at your location caused by multiple factors like temperature and elevation. Different pressures have an impact on air density which in turn will impact the amount of fuel necessary as well as peak boost and the way in which the turbo spools. At lower pressures (higher elevation) the turbocharger will have to work harder to achieve the same boost pressures.
RPM
Engine Revolutions per minute. This let’s us see what speed the engine is moving at. Additionally conditions of acceleration, deceleration and maintaining a steady speed will all cause variations in the fueling and ignition timing
Throttle Position
How far open the throttle is open changes airflow to the engine and when combined with the RPM helps to give an indication of the amount of load the vehicle is under.
Timing Cor. Cyl 1-6
This shows the amount of timing (in degrees) being pulled or added for each cylinder. Large negative timing corrections throughout several cylinders throughout the rev range will typically indicate there is an issue.
Additional Monitors
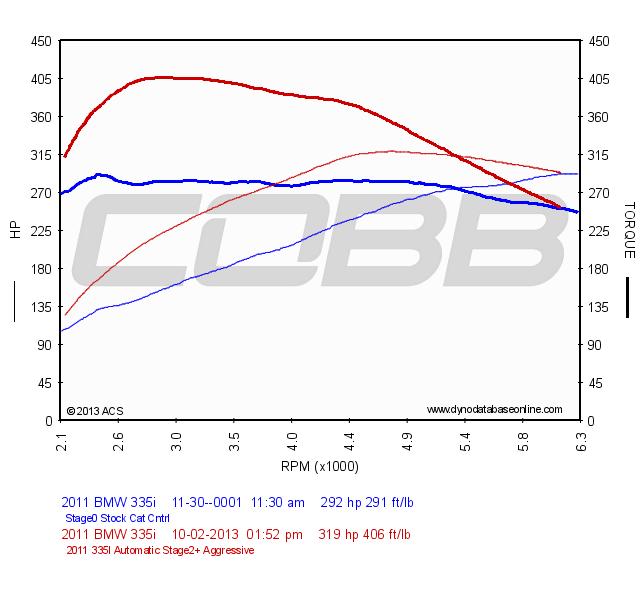
There are several other monitors that can be utilized. Boost is always fun to monitor. Seeing certain variables before and after modifications is a great indicator of whether they are providing real results. For instance, being able to monitor both Ambient Air Temperature and Charge Air Temperature and comparing them in real time is revealing. You can see just how much more efficient that new FMIC is! Monitoring/Logging Airflow Mass can also be indicative of whether that new Intake is doing work! Another great comparison is to see what the car is doing between the Stage 0 (stock map installed mode) and our Stage 1 map. This way, you can be 100% certain nothing detrimental is happening with the upgraded tune.
Our customer service is among the best in the industry. If you need help taking or interpreting your datalog or trying to diagnose an issue, send it to us at support@cobbtuning.com and we’re always happy to take a look and point you in the right direction.
Leave a Reply